User Management and Communication New
1. Student groups
To create student groups, navigate to the "Participants" tab in the secondary navigation bar.
From the dropdown select "Groups"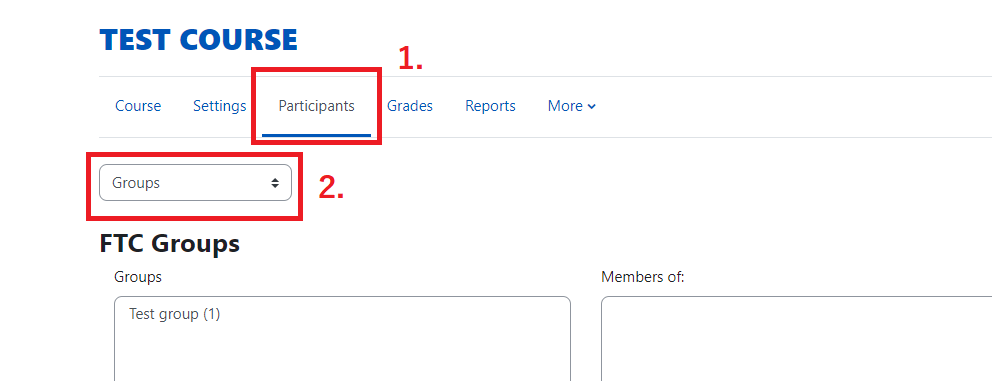
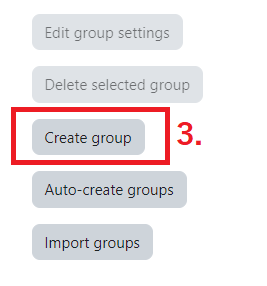
Click "Create group"
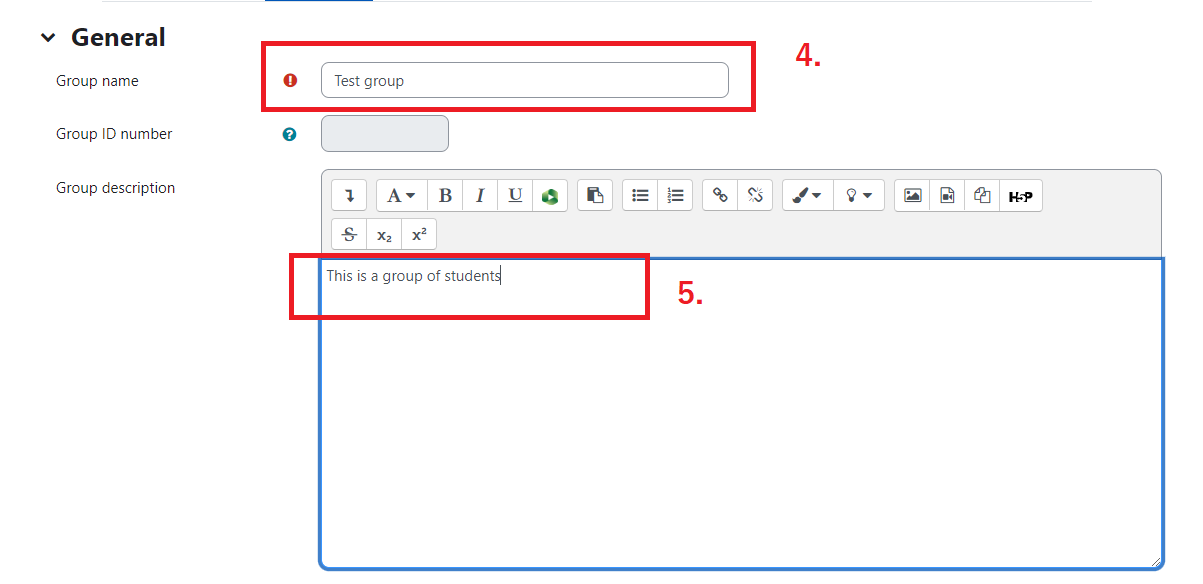
Give the group a name. You can also add a description but it is not required. When you are done click "Save Changes" at the bottom of the page.
Once you have created the groups, you will be ready to add students to the groups. To do this select the group you want to work with in the left "Groups" box. The name of the group will appear above the right hand "Members of: xxxxxxx" box. The number in parenthesis is the number of current members. Click the "Add/Remove users" button
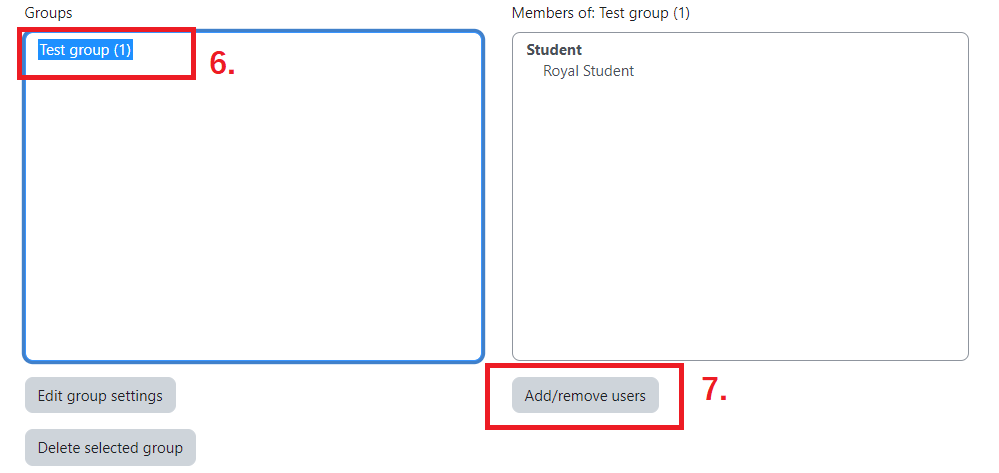
Select a name from the list of users and click "Add." If you make a mistake you can select them from the list on the left and click remove. Note: you will be able to keep track of who has been assigned to a group by the number in the parenthesis behind a users name. This number is the number of groups they have been assigned to.
When you are done, click "Back to groups."
2. Adding participants to courses
All participants must be registered for academic courses through the Registrar before gaining access to the course in Moodle. Please note the following processes for certain circumstances
Adding students to academic courses
If you would like a participant added to your course who is not on the class list OR you would like to change a current participant's role in your course, please contact the Registrar at registrar@emu.edu. If a student does not show up in the course within a few days of registration, please submit a ticket to the Helpdesk by emailing helpdesk@emu.edu or by submitting a ticket here. Please provide the course code and the student's name with your request.
Adding teachers and TAs to academic courses
Additional registration and role changes must be granted through the Registrar. Please contact them with your request by emailing registrar@emu.edu.
Adding students to department or other non-academic courses
You can now request that students be added to department courses automatically based on certain criteria. For example: "All students majoring in Computer Science need to be in my department or non-academic course." To do this, your course needs a course code. Please email the Registrar at registrar@emu.edu to have them set up a new shell course in J1 following the appropriate enrollment criteria. The Helpdesk will assist you in moving the content over from the previous course to the new one. If the participation in your course does not follow a specific pattern, contact the Helpdesk for more solutions.
Adding teachers to past academic courses
Instructors may be added to courses from previous semesters for reference as long as the instructor from the previous course has given permission to do so. If you would like to request access to a previous course, please send an email to the helpdesk at helpdesk@emu.edu and copy the previous instructor after gaining their permission.
3. Adding a participant to course
How to add students to academic courses:
After they are registered for the course through the Registrar and the data put in J1, our automated process runs throughout the day to check for new registrations. However, if a student does not show up in the course within a few days of registration, please submit a ticket to the Helpdesk by emailing helpdesk@emu.edu or submitting a ticket here. Please provide the course code and the student's name with your request.
Why can't I add the student to the course?
Since Moodle 3.11, manually adding participants to a course is no longer available due to changes in the automated enrollment management system that are not able to accommodate manual enrollments without causing problems. To avoid this situation, the Helpdesk must be involved in managing manual enrollments.
Why do students need to be enrolled?
Participants in academic courses must be enrolled in the course through the Registrar or the participant will not get credit for the course on their transcript. All students enrolled in courses in J1 are automatically enrolled in the same courses in Moodle. Likewise, when students are no longer enrolled in J1, their enrollments are removed in Moodle. Exceptions to this automated process must now be managed by the Helpdesk to avoid problems with these enrollments.
How do I check if a student is enrolled in J1?
-
Go to my.emu.edu and log in.
-
Under the "Academics" tab, select "Faculty" from the left sidebar.
-
Find the class the student should be enrolled in from your course list
-
Under the third column "Go Directly To", select "Class List" from the dropdown
If the student is not listed there or has the status "Reserved" please contact the Registrar as their information either has not yet been entered in J1, or there is a hold on the student's account. If, however, they are listed as enrolled in J1 but do not show up in the Moodle course within a few days of registration, contact the Helpdesk to ensure that Moodle enrollments are properly updated.
How to add students to department or other non-academic courses:
You can now request that students be added to department courses automatically based on certain criteria. For example: All students majoring in Computer Science need to be in my department or non-academic course. To do this, your course needs a course code. Please email the Registrar to have them set up a new shell course in J1 and Helpdesk will assist you in moving the content over from the previous course to the new one. If the participation in your course does not follow a specific pattern, contact the Helpdesk for more solutions.
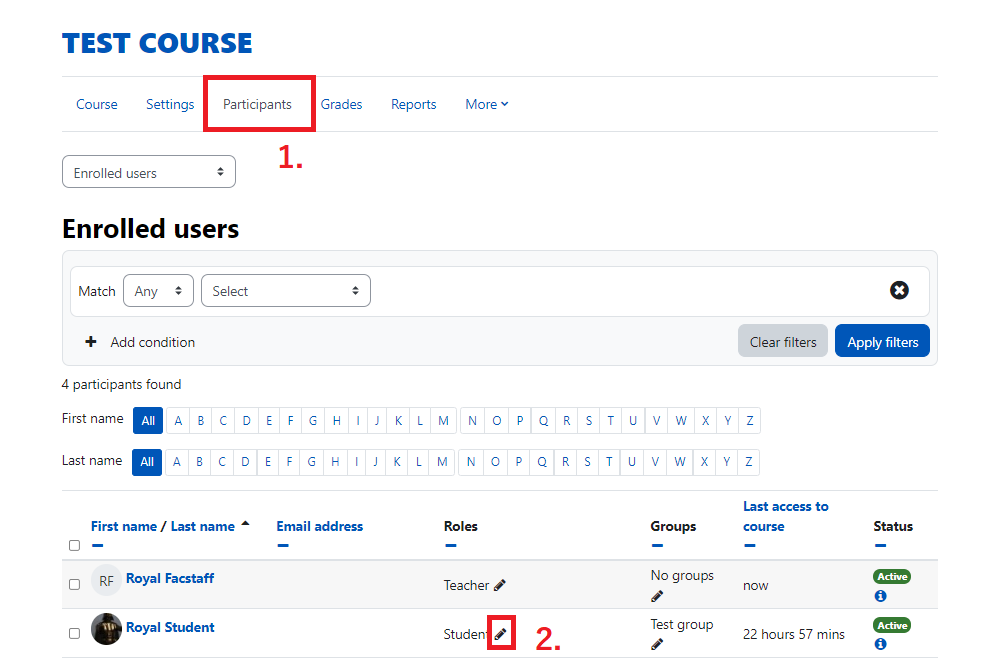
4. Change the role of a participant
Navigate to the "Participants" tab in the secondary navigation bar
Find the participant whose role you would like to alter and click the pencil icon
Click the dropdown and select the role you wish to grant the participant. Note: Permissions for users with more than one role will defer to the highest level of access.
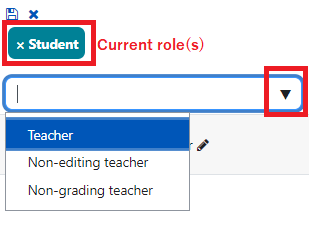
Teacher - Can do anything within a course, including changing the activities and grading students.
Non-editing teacher - Can teach in courses and grade students. but may not alter activities.
Non-grading teacher - Can teach in courses and alter activities, but may not grade students.
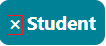
To remove a role, click the x beside the role title.
To save changes, click the save button above the role tags.

To cancel changes, click the blue x above the role tags.

5. Self enrollment
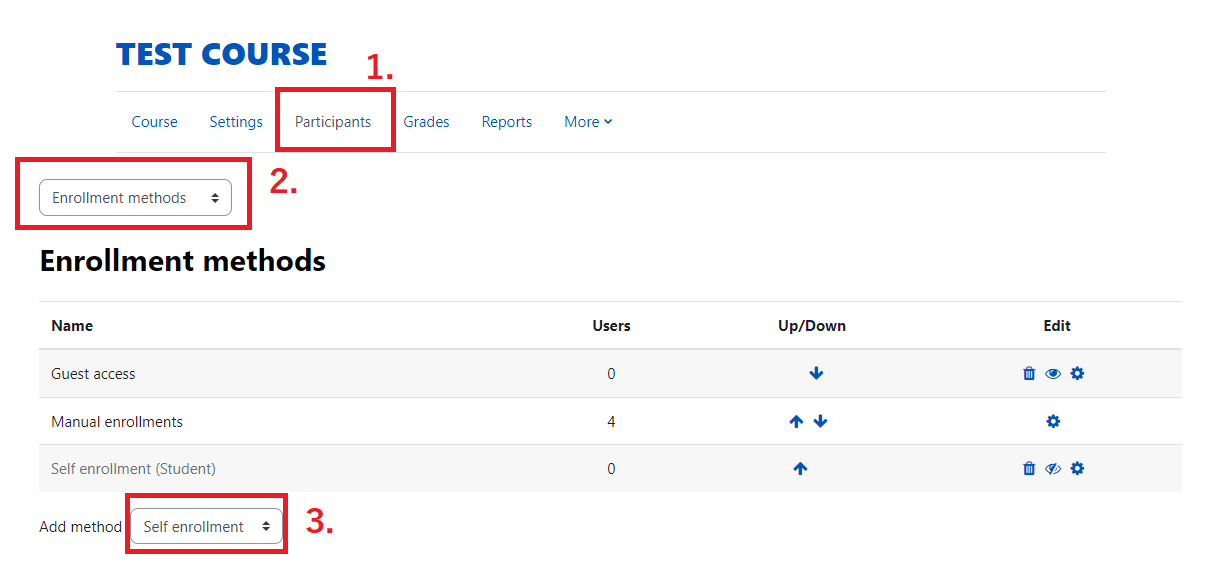
To setup self enrollment Navigate to the "Participants" tab in the secondary navigation bar.
From the first dropdown select "Enrollment methods"
From the second dropdown select "Self enrollment."
Enter an "Enrollment key" or password for students to enter to join the course.
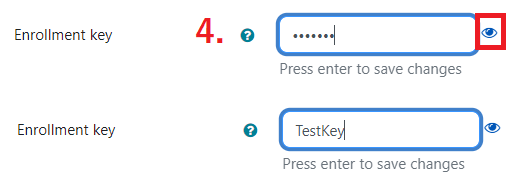
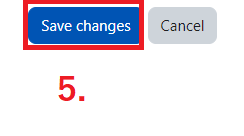
Click "Save changes" to apply.
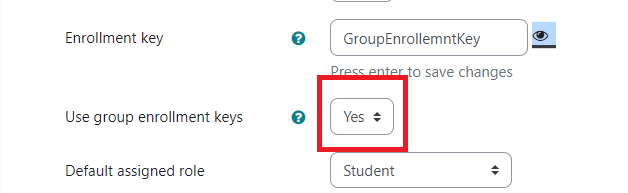
If you would like to have students self enroll and automatically be sorted into groups, create a new self enrollment method with a new Enrollment key and enable "Use group enrollment keys." Note: If you are creating multiple enrollment methods, it is a good idea to give each of them a unique name.
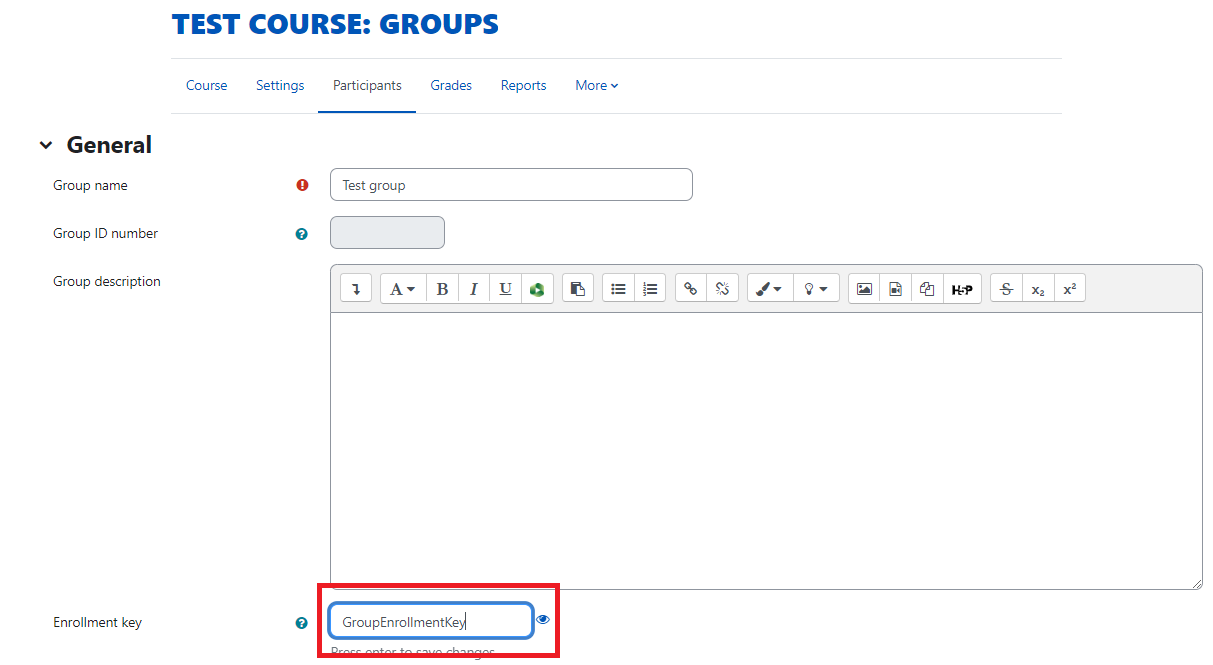
Create or edit a premade group and add the new Enrollment key to it
When you want a student or group of students to self enroll, you will give them the key associated for the group you would like them in. When they complete the self-enrollment process they will automatically be in that group.
The student can reach the self enrollment page by searching for the course or by clicking on a link to the course.
6. Enroll students in a Meta-Course
NOTE: Please make sure that the course you are doing this with is the course that you want to use and bring the students from the other courses into.
Meta-Linking enrollment is an ideal way to join classes together that will consist of the same content across different courses. This enrollment method essentially takes all of the participants of one course, and imports them into the other. For example:
Class 101 A has the following enrollments: Teacher 1 Student 1, and Student, 2,
Class 101 B has the following enrollments: Teacher 1, Student 3, and Student 4
Both classes have the same content, but meet on different days. Teacher 1 would prefer to only need to edit one course (Class 101 A).
Enrollments after Meta-Linking:
Class 101 A: Teacher 1, Student 1, Student 2, Student 3, Student 4
Class 101 B: Teacher 1, Student 3, Student 4.
Teacher 1 will then hide Class 101 B from students and rename Class 101 A:
Class 101 A & B: Teacher 1, Student 1, Student 2, Student 3, Student 4Class 101 B: Teacher 1, Student 3, Student 4. (Hidden)
This is an excellent case for Meta-Linking.
Note: Student 3 and Student 4 will only receive credit for Class 101 B on their transcript as this is the course they are registered for. This means Class A and Class B participation and final grades must be tracked and reported separately.
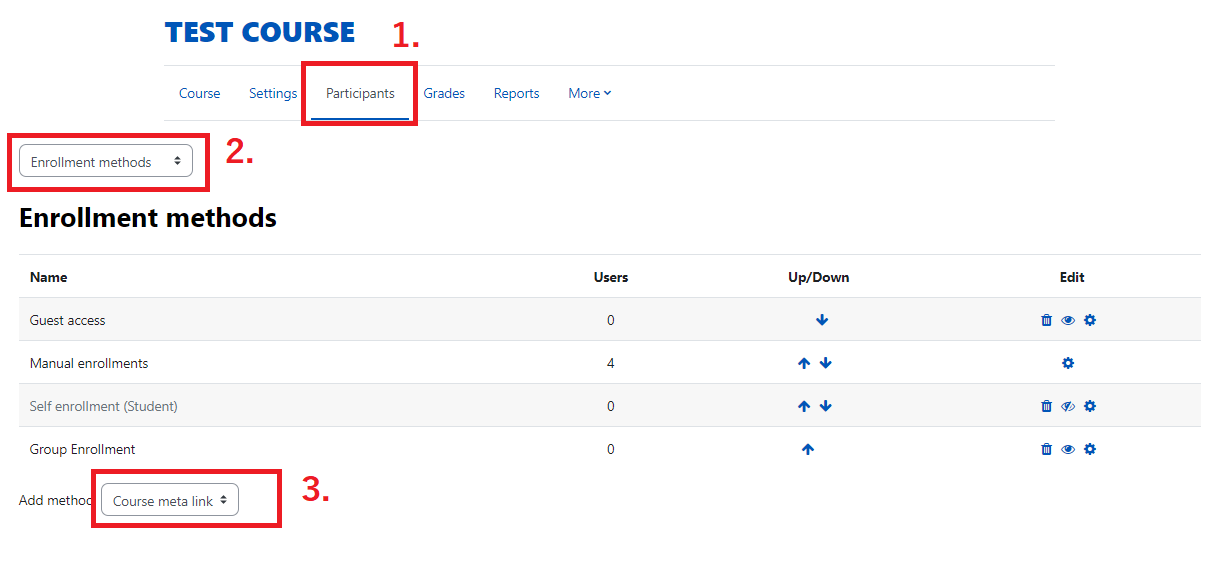
To Meta-Link the course, navigate to your course you would like to import all of the participants into. Click on the "Participants" tab in the secondary navigation bar and select "Enrollment methods" from the dropdown.
Under the "Add method" dropdown, choose "Course meta link."
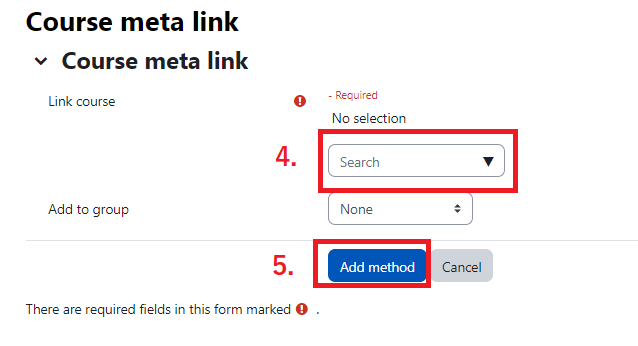
Click the dropdown under "Link course" and choose a course to import students from. Note: You will only be able to link students from courses you already have access to as a teacher.
After you have finished adding the method, the students will be able to see the new course. It is recommended to rename your main course to be all encompassing of the different classes and to hide the secondary classes.
7. Communication
There are a number of ways to communicate with students, but perhaps the easiest and most efficient ways is to use the Quickmail Block.
Once you add the Quickmail Block to your course, you can configure several options. Let's start with a signature.
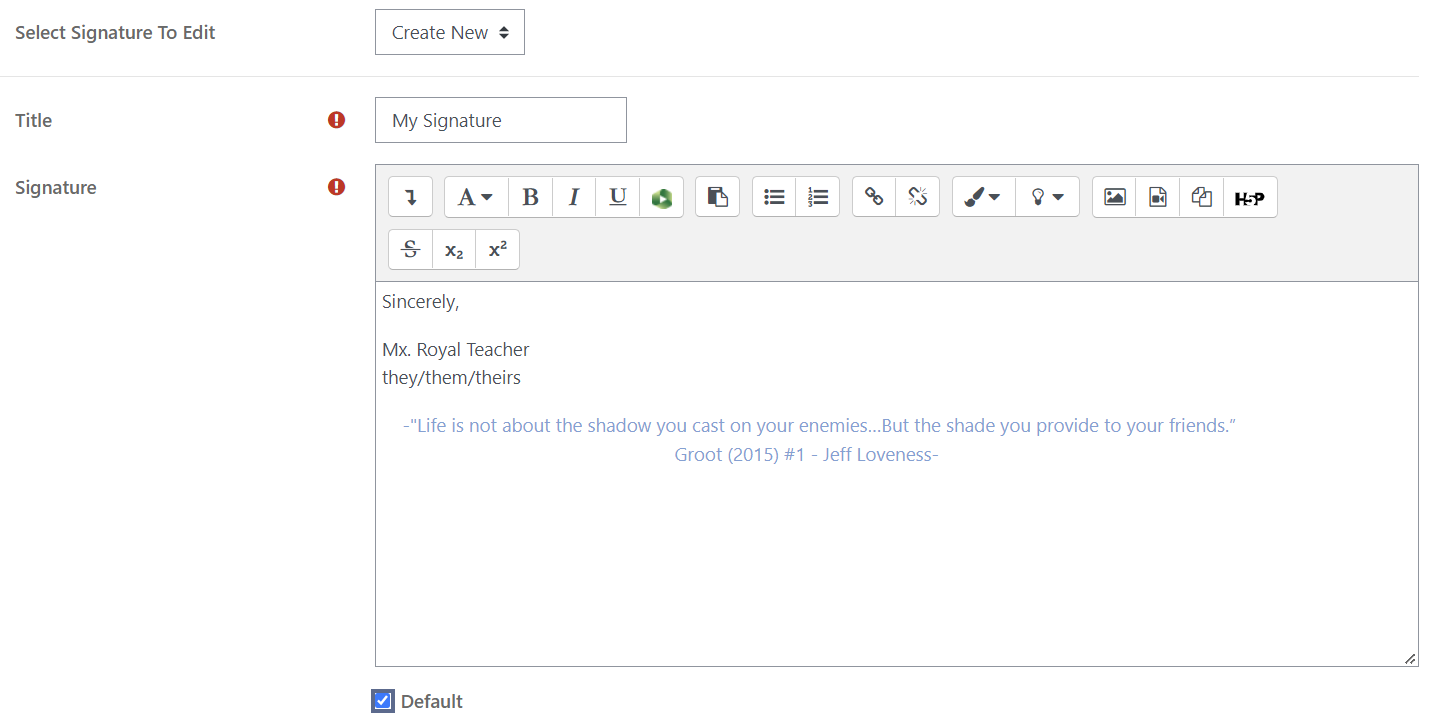
Signature
In the Quickmail block, select "My Signatures" next to the pencil icon. In here you can edit your current signature or add a new one by giving it a Title and adding your Signature in the large space and checking "Default" to automatically add this signature to the end of all of your future Quickmail messages.

Sending a message
- Select "Compose Course Message."

- Select the email you would like to send the message from.
- Select who you would like to send the message to. You can send messages to all users in the course, a group, or to individual students. You can also exclude certain users as well.
The below example shows that the message will be send by the email noreply@emu.edu which is the standard email. The recipients of the message is everyone in the course, except for anyone in the group "Group A."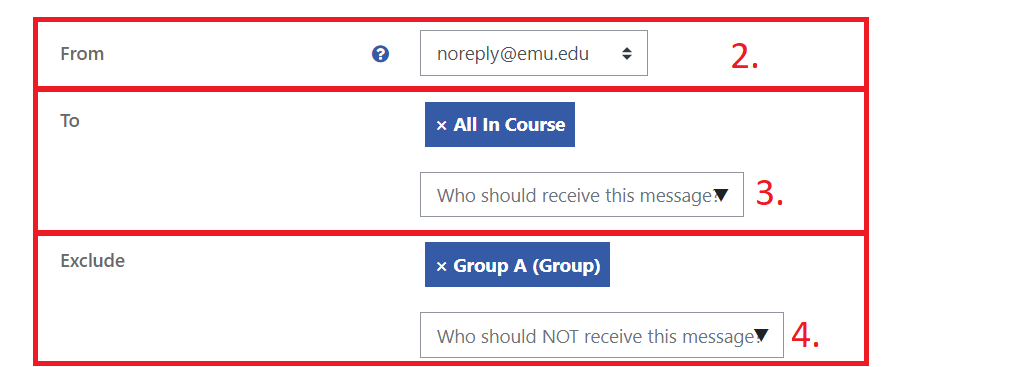
- Give your message a Subject and Body and attach any files you would like to be included. You can pick the attachment via the file explorer or drag and drop the file into the box.
- Choose which platform you would like the message to go through (Moodle or Email)
- Optional: Choose a time to send the message
- Optional: Receive a send report to yourself